Showing posts with label 1. Show all posts

Sunday, April 10, 2016

Eggshell Calcium Carbonate Leavening Part 1

0

A few weeks ago, we were reading a 5 Acres and a Dream blog post about making homemade leavening from wood ashes (i.e., from potassium carbonate, K2CO3), and a reader in the comments section asked if calcium carbonate (CaCO3) from eggshells, which also reacts with acid to release CO2 gas (reaction below), could be used as a leavening agent.  We had been wondering the same thing for quite a while, and the realization that other folks were wondering the same thing provided the motivation we needed to finally get up and do some experiments.

Reaction of calcium carbonate (CaCO3) in eggshells with acetic acid in vinegar
Calcium carbonate (CaCO3) reacts with acetic acid in vinegar to make calcium acetate, carbon dioxide gas (CO2), and water (H2O).

First, some eggshell chemistry.  Eggshells are about 95% CaCO3, but the CaCO3 is bound in a matrix of protein, with a proteinaceous membrane also attached. Thus, one might expect that eggshells would make a better leavening agent if the CaCO3 could be isolated from the protein (and/or ground very finely) so that it would be more accessible to the acid during baking.  The question is, how to get rid of the protein?  Well have to either dissolve the protein away from the CaCO3 or dissolve the CaCO3 away from the protein and then regenerate it somehow.  Today well try the former.

Theres quite a bit of precedent for dissolving away the eggshell protein (or at least, most of it) with a strong base, such as sodium hydroxide (NaOH) or potassium hydroxide (KOH), but specific recipes are hard to come by.  Several articles refer to this original gem, the most useful being this one, which allows us to deduce that those guys boiled their eggshells in a 2.5 wt% NaOH solution for 5 minutes, which easily removed the membrane and part of the protein matrix.  They then increased the lye concentration to 10 wt% and boiled for a long time, finding that all the protein that could be removed was gone by about 7 hours.  They didnt give a lye-to-eggshell ratio, though.  Additionally, this patent references another patent (we couldnt track down the original) claiming that boiling eggshells in 3 wt% NaOH would reduce the protein content of the shells to < 0.1%, although the boiling time and lye-to-eggshell ratio wasnt specified.

A protein content of < 0.1 wt% sounds good enough to us, so we decided to follow that route most closely.  Having to guess on the time and lye-to-eggshell ratio, we decided that if we had to boil for more than half an hour and use more than a 1:1 ratio, that it wouldnt be worth our trouble. (In that case, wed just use Leighs ash-based leavening instead!)  Alright, experiment planned; lets do this!

Starting to boil eggshells in lye water
Heres our recipe: 15 g NaOH, dissolved in 500 g tap water, with 15 g coarse-ground eggshells (1-2 mm particles) added.   Boiled for 30 min.  Wear safety glasses and gloves until everything is neutralized later on (see below).


Boiling eggshells in lye water
As the mixture simmered, the lye water turned a cloudy yellow.  A good sign that were dissolving protein.


Filtering lye-boiled eggshells
After boiling, we poured the liquid through a coffee filter (supported by a polypropylene funnel) into a quart jar.  The eggshells dont look that much different than before, except maybe slightly darker.  The pigment (they were brown shells) is still there.  The coffee filter is really slow, so something like an old t-shirt or terrycloth towel might be better.


Filtrate from lye-boiled eggshells
The filtrate is still highly caustic, so be careful with it!  We wanted to neutralize it before doing anything else, so we added a couple tablespoons of our good ol red cabbage pH indicator, causing the filtrate to go from yellow to slightly-darker-yellow.  Note if youre following along at home--dumping the filtrate down the drain without neutralizing might kill some of your friendly septic system bugs, so please neutralize!


Vinegar and neutralized lye solution
Then we added vinegar until it turned green, then blue, then finally purple, indicating a neutral pH.  (We had to add a few more tablespoons of pH indicator as it got more and more dilute, because the color changes started to get hard to see.) Now it can go down the drain or into the compost.


Decreasing pH of eggshell rinses after boiling with lye
The next step is to repeatedly rinse the boiled eggshells to wash all the lye off.  These are the rinses (plus pH indicator), showing steadily decreasing alkalinity.  After the fourth rinse (which was with vinegar), the filtrate is neutral, the eggshells should be substantially free of lye (and hopefully protein!), and were good to move on (and take off our safety glasses and gloves).  We also neutralized the second and third filtrates with vinegar, too.  Safety note: working with lye on something youre planning to eat has the potential to cause some serious damage if you dont neutralize properly.  Be careful and only do this if youre comfortable with the chemistry! Also, make sure youre using pure lye, and not some cleaner that has lye combined with other chemicals.


Drying lye-boiled, neutralized eggshells
Drying the lye-boiled eggshells makes them easier to work with. In the oven at 300 °F for 15-20 min ought to do the trick!


Biscuit experiment preparation
Time to make some experimental biscuits!  Five sets of three biscuits each.  Recipe per set: 0.5 cups all purpose flour, 0.25 teaspoon leavening, 0.125 (1/8) teaspoon salt, 1 tablespoon butter (in the bowls), 1 teaspoon apple cider vinegar plus milk (2%) to bring the volume up to 0.25 cups to make a faux buttermilk (in the glasses).  We processed the bowl contents in a food processor for about 5 seconds to cut in the butter, then added the "buttermilk" and processed for another 5 seconds to mix everything up, scooped the dough/batter into drop biscuits and baked at 400 °F for about 20 min.  The five sets differ only in their leavening: no leavening, lye-boiled coarse-ground eggshells, coarse-ground eggshells, fine-ground eggshells, and baking soda.


Eggshell leavening biscuit comparison
After baking, there a clear difference between the No Leavening control and the rest, but also between the baking soda and the rest.  Between the eggshell sets, the lye-boiled and the finely-ground are about equal, and slightly more risen than the coarse-ground.  However, all the eggshell sets are very close to each other, and closer to the control than to the baking soda.  Also, we didnt have enough room for all fifteen biscuits on this sheet, so we baked the third biscuit of the last three sets separately.  Their appearance was consistent with the biscuits here.  Hooray for reproducibility!


Eggshell leavening biscuit texture comparison
The textures are consistent with the appearance, but its hard to tell from the photos.  Also, the biscuits other than the baking soda set werent cooked all the way through after 20 min.  We put them back in the oven; after another 15 minutes they were no longer doughy, but they didnt rise any more.  The flavor of all the sets is decent, so the control set and the eggshell sets would make decent dumplings if youre into that sort of thing.  Overall, the conclusion from these experiments is that the eggshells provide some leavening effect, but not much.  For us, the ground eggshells dont really get the job done, and its definitely not worth the effort of boiling them in lye water to dissolve off the protein.

But were not done with these experiments yet!  Stay tuned for Part 2, where we dissolve and regenerate the calcium carbonate part, and see how that works as leavening!


Read more

Thursday, March 31, 2016

Homestead Happiness April Week 1

0

Overwintered crops, physical acquisition of seeds, workable soil, and gypsy ducks made us happy this week.

The chard and garlic under the row cover are really taking off.

Compared to the stuff planted the same week last fall outside the row cover, this garlic is at least an order of magnitude larger.  Plus, the chickens may have eaten the unprotected garlic.

Ducks in the front yard?  We only saw them one day though, so they must be transients.  Maybe we should build a second nest box in case any others stop by.

The fruit trees and dandelions are starting to bloom.  That led us to stand in the yard yelling at the trees to slow down, because our bees arent coming for another two weeks.  That, in turn, led the neighbors to wonder if we had finally gone over the edge.  But our fruit trees seem to be lagging the neighbors, so maybe it worked!

Fresh chives for breakfast!

We were able to start turning over some new garden beds, which was good since were already behind schedule on starting seeds and direct sowing things like onions.  Our hope was that taking off the sod with a mattock and piling it on the bed would inspire the chickens to scratch through the clumps, in the process knocking off the topsoil.  Unfortunately, they seemed mostly uninterested in it...until we took off the sod ourselves and covered it in compost.

Seeds arrived! Time to get our plant on.

 What made you happy this week?

Read more

Tuesday, March 22, 2016

Updating the Integral Urban House Chapter 1

0

The Integral Urban House, published in 1979, is one of the truly seminal books in urban homesteading.  The book records the experiments of the houses residents as they remodeled the house and site to minimize waste generation and resource consumption while maximizing on-site production of food and energy.  The book gives an outline for a very methodical and calculated optimization of those goals, and lays out expectations for limits on the degree of self reliance one can expect from a city lot.  Although it was published almost 35 years ago, The Integral Urban House is still one of the most comprehensive and detailed guides for becoming as self-reliant as ones circumstances allow.  The methods developed by the authors are quite keen on conserving space, but the main concepts are applicable regardless of ones available geological surface area.  However, although the philosophies and motivations have stood strong since the books original publishing, one big catch is that, since 35 years ago, the technology and resources available to aspiring homesteaders (urban or otherwise), have changed dramatically.

The books original cover.  A reprint in the 1990s had a green-colored version

We thought, therefore, that it would be a worthwhile endeavor, although immense, to work our way through the book and rehash the authors research with insights from the modern era.  We also wanted to add perspective from a colder climate since the book (and even many modern urban homesteading books) are somewhat centric to areas with mild winters.  (The Integral Urban House was in Berkeley, CA).

The real meat of the book starts in part two, with chapter four covering energy conservation.  The first three chapters mainly describe the motivation and approach, which dont need much updating.  In the interest of completeness, well cover those as well, but with a more descriptive take.  On the docket for today: Chapter 1: Beginnings.

The chapter starts by pointing out that the book is more about the ideas of transitioning from linear to cyclic systems than the authors implementation of the ideas on their specific space in Berkeley.  The authors mention several other similar projects throughout the country, including the Ouroboros house in Minnesota, the East Eleventh Street Project in New York (mentioned here), the Institute for Local Self Reliance in Washington, DC, and (not mentioned but pertinent) the New Alchemy Institute in Massachusetts.

From there, the authors get into the motivation for the book from the (now standard) angles of peak oil is coming (the book was published in the wake of the 1973 oil embargo), what would you do if society implodes?, and modern technology has flooded our bodies with carcinogenic chemicals while allowing us to eat unhealthy food and be lazy.  Those angles are nowadays a dead horse still being beaten, but they were quite fresh in the late 1970s.  Regardless of ones position on the availability and consequences of fossil fuels, the point was (is) that the urban lifestyle as typically manifested, was (is) shortsighted, polluted, and unsustainable.  Since the authors also feel that few urbanites could, should, or have a desire to de-urbanize, it might be tempting to interpret the theme of the book to be something like how to make the best of a bad situation.  But its not really that.  Other huge driving forces for the authors were the psychological and economic liberation that accompany self reliance, especially if the self reliance comes in a setting with limited natural resources.  As architects, engineers, and scientists, the authors also embraced the challenge of developing a house that was both a habitat and life-support system.  The authors further acknowledged that the urban environment provided a high concentration of like-minded folks to help their community-scale projects, such as waste recycling, gain momentum.  And above all, the authors wanted to provide a model that others could work from in their own houses and communities.

The authors recognized that their ultimate goals for the house would require lifestyle and behavior changes, and identified nine factors that they observed to influence their ability to make such a change:

  1. Cultural/personal taboos, e.g., working with human wastes
  2. Urgency of making the change, e.g., reducing water consumption during a drought
  3. Sustained awareness, e.g., frequently seeing dead plants during a drought
  4. Family/community support, e.g., having a community recycling infrastructure when starting to recycle
  5. Stress induced by not making the change, e.g., overflowing garbage cans because recyclables not sorted
  6. Information availability on options for change
  7. Immediacy of rewards for making the change
  8. Self image
  9. Concrete models available
Clearly, the internet has changed the game for many of these factors since abundant information and models around the world are now available with the click of a few buttons.  The internet can also provide a sort of community support and make the end result of both making and not making a change more visualizable, which can in turn influence ones self image, ones opinion of the rewards, and the stress one experiences from not making the change.

The authors also adopted a process for taking a desired change from conception to practice, which included perception of a problem, articulating the solution, visualizing different approaches to solving the problem, selecting and affirming the best approach, and finally implementing the change.  The internet has also changed that:

Differences between the approach to solving a homesteading-related problem as practiced at the Integral Urban House in 1979, and what  (some) modern homesteaders do in 2013.
 
Have you read the Integral Urban House?  What did you think of their approach?  Do you know of other integral houses?  Let us know in the comments section below!


Read more

Monday, March 14, 2016

Historical Lye Making Part 1

0

One thing thats not done as much anymore as it should be is making lye on the homestead.  A major contributor to this phenomenon is likely the abundant scary stories and mystique of danger surrounding lye because of some horrible accidents in the past and a general fear of the unfamiliar.  This isnt to say that lye isnt dangerous--it certainly deserves a healthy respect and some reasonable precautions--but, like most things, having an awareness of the properties and dangers is a better approach than running away screaming or cowering in the corner like a congressman.

Ok so, newly emboldened about the utility of lye, lets take a look at why you would want to make your own.  Other than not having to buy an ingredient for your soap-making days, starting with a potassium-based lye instead of a sodium-based one (typically whats available commercially) makes it easier to recycle the soap as part of your graywater scheme since you dont have to worry about sodium buildup.  (Plants need more potassium than sodium.)   In addition to soapmaking, youll save on ingredients for your homemade drain cleaner, biodiesel (if you get really good at making lye), and lutefisk recipes.

Back in the olden days, when soap making was a standard activity on the homestead, the source of lye was normally wood ashes.  (Even back then, folks knew that grass ashes (e.g., from corn cobs) gave more lye than wood ashes, but no one burned grass in significant quantities.)  The goal was to leach the soluble lye, mostly potassium hydroxide (KOH) in this case, out of the wood ashes, leaving the insoluble parts behind and obtaining a concentrated lye solution.  More generally, however, wood ashes were leached to collect potash: an umbrella term for soluble potassium salts, which could contain potassium hydroxide (KOH), potassium carbonate (K2CO3), potassium chloride (KCl), etc.  The potash was commonly evaporated to dryness and sold as fertilizer when it wasnt used to make lye for applications around the homestead.  And, as with most old homesteading practices, there is an interesting confluence (to us, anyway) of chemistry and history around the lye-leaching process.

Traditional lore says that lye should be leached from hardwood ashes, especially hickory. The reason hardwoods, and especially hickory, should be the best has puzzled us for a long time, since modern methods suggest that softwoods contain no less potassium than hardwoods, at least inherently.  However, old sources also show some data confirming that indeed, less potash is obtained from softwood ashes than hardwood ashes.  Why should that be the case?  We can think of two possible (but contradicting) explanations, neither of which we can find confirmation for.

First, many sources assert that softwoods contain more resins (although we havent been able to find any quantitative measurements), and thus burn hotter than hardwoods.  The modern source linked above shows that ashes from wood combusted at temperatures above 900 °C lose a significant amount of potassium to evaporation.   Thus, if softwoods burn at 950 °C and hardwoods at 700 °C, softwood ash would likely contain less potassium than hardwood ash.  However, 900 °C is a very high temperature, especially for the open-air fires common before the turn of the last century.

We think its more likely that softwoods dont burn as cleanly, and more of the inherent potassium remains locked up in the incompletely burned remains.  Some experimental evidence from the period suggests that leach-resistant potassium can indeed be found in incompletely burned softwoods.  (On the other hand, that may mean that softwood biochar is more beneficial for the garden than hardwood biochar as a slow-release potassium fertilizer.)

In any case, it seems legitimate that hardwood ashes are preferable to softwood ashes for making lye, and a clean-burning, fairly hot fire (but less than 900 °C) is the best way to get those ashes.

Also, some old lye recipes call for adding lime or slaked lime to the ash-leaching barrel.  The reason for this addition is clear:  in water, lime (calcium oxide, CaO) becomes slaked lime (calcium hydroxide, Ca(OH)2), which reacts with potassium salts, such as potassium carbonate (K2CO3) to form calcium carbonate (CaCO3) and potassium hydroxide (KOH, the lye we want!).  Depending on conditions, however, the majority of potassium may be leached as the hydroxide anyway, so the lime may only give an incremental increase in lye yield.  Many lye makers dont bother with the lime and still make fine soap, so it seems that the lime must be optional.  For fancy-pants lye making only, if you will.


Additionally, lye leached in traditional ways often times comes out transparent-ish, but very brown-colored.  The reason is that the layers in a lye-leaching bucket normally included a layer of sticks, a layer of straw, and then the ashes.  The lye leached from the ashes can start to decompose the straw and/or sticks, which yield the brown-colored compounds (primarily from solubilized lignin components).  Leaching the lye through a different material, like a tightly-woven t-shirt (multiple layers), or leaching through the straw so many times that all the brown parts are dissolved, would probably yield a clear lye solution.

Finally, many sources indicate that lye should be leached from ashes using distilled (or rain, or soft) water.  For leaching lye per se, water hardness shouldnt make much difference (see paragraph above about adding lime), but if you plan to make soap from the lye down the road, it will be beneficial to not have the hardness in the water.  The cations in hard water are divalent (+2 charge), which means they will take on two soap molecules, become essentially nonpolar, and precipitate out of the aqueous solution, almost exactly like a Dementor eating someones soul (if one soul = two soap molecules).

The setup for a lye-dripping (leaching) trough, as described in several old books.  It could also be a barrel with a plug in it.  Dont forget to put a bucket under the arrow, or your lye will run out onto the ground.  For other setups, see here, here, and here.

 After leaching the lye, it should be tested for strength.  There were a number of traditional methods, including floating eggs or potatoes, dissolving feathers, and making sure it tastes incredibly bitter.  (Dont try the last one).  Modern techniques include testing the pH and/or measuring the density (the latter being an updated version of the egg or potato test). 

Since this post is already very long, well wrap it up here.  Check back on Sunday for Part 2, featuring lots of pretty colors!

In the meantime, have you dripped your own lye from ashes?  What did your setup look like?  Do you have a better idea why hardwoods are better than softwoods for making lye from the ashes?  Let us know in the comments section below!

Read more

Saturday, March 12, 2016

Homestead Happiness June Week 1

0

Summer is really kickin into gear around here, and although the spring was a struggle for garden prep and pollinators, theres some good news from the Lab on both fronts this week.

Our wildflowers (Erysimum, Wallflowers) from a few weeks ago were joined in bloom by some feral roses this week.

We havent seen many bees on either of those, but the wallflowers are being worked by some hover flies.  We think this specimen is Eristalis arbustorum.

Meanwhile, the hawthorn a few feet away has its own ecosystem of insects pollinating it.  Another hover fly (probably a Drone fly), a blue bottle fly, some small feral bee (or small feral bee-imitating hover fly) we couldnt identify, and the honey bees we were hoping to see there.  There were at least two other species that we couldnt get good photos of.  But, in trying to identify these bugs, we learned that the larval stage of many hover flies (although not of these two) eat aphids, and some eat scale and other garden pests.  So, stick around, hover flies, well need you soon! (...and feel free to check out the scale on our Meyer lemon tree; we set it by the driveway for you.)

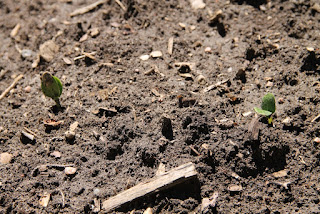
In the garden, our squash have sprouted!

The kale is also up, although it would have been nice to get this in the ground several weeks ago.

Meanwhile, our tomato plants seem to have largely survived (so far) the bi-daily hail storms weve been getting.  We did have to replace a couple pepper plants in what were referring to as a jalapeno emergency.

Strawberry season is so close we can taste it.

We also got a double-yolked egg from our Red Star hen that broke the 4-oz barrier.  We think there should be an additional category for eggs this large.

What made you happy this week?

Read more

 
Powered by Blogger