Showing posts with label 3. Show all posts

Wednesday, June 1, 2016

Dakota Rocket Silo version 3 0

0

We love our Dakota Rocket Silo--it helps us cook outside, put our pruning brush and small-diameter dead trees to good use, render wax, make biochar, and do lots of fun things.  But the original and rebuilt designs had one flaw that cropped up during extended use:


The piece of ground between the holes gets baked pretty good, and eventually weakens and starts crumbling, which makes the chimney part not level.  It might not be as much of a problem with wider cinder blocks where more of the support comes from the sides.

But weve got skinny cinder blocks, so we took out the middle part and built a brick foundation.  Theyre not fire bricks, so they probably wont last too long, but they were free!  This setup lets us keep the in-ground aspect that we like so much, but hopefully will stay level for longer.  Plus, it looks kind of Petra-esque.

We fired it up, and sure enough, it burns like a champ.  Next test: will it stay level through a winter?

JalapeƱo popper, anyone? (They took a LONG time to cook this way, but they were really good!)


Read more

Tuesday, May 31, 2016

Homestead Happiness April Week 3

0

More fresh veggies, an archeological discovery, and grass-craving chickens made us happy this week.

Our onion sets from last year that didnt produce bulbs, are just the right size for eating as green onions right now.  And since we want to use that garden space for other veggies this year, its a perfect storm for green onion-themed cuisine. Yum!

While digging up a garden bed, we hit a buried brick.  Further digging revealed that it was actually a line of bricks, two wide, and about six inches underground.  We havent had a chance to chat with the neighbors yet to see if they know what its from, but clearly some sort of man-made thing used to exist here.  Could it be a clue about our absurdly high selenium levels?

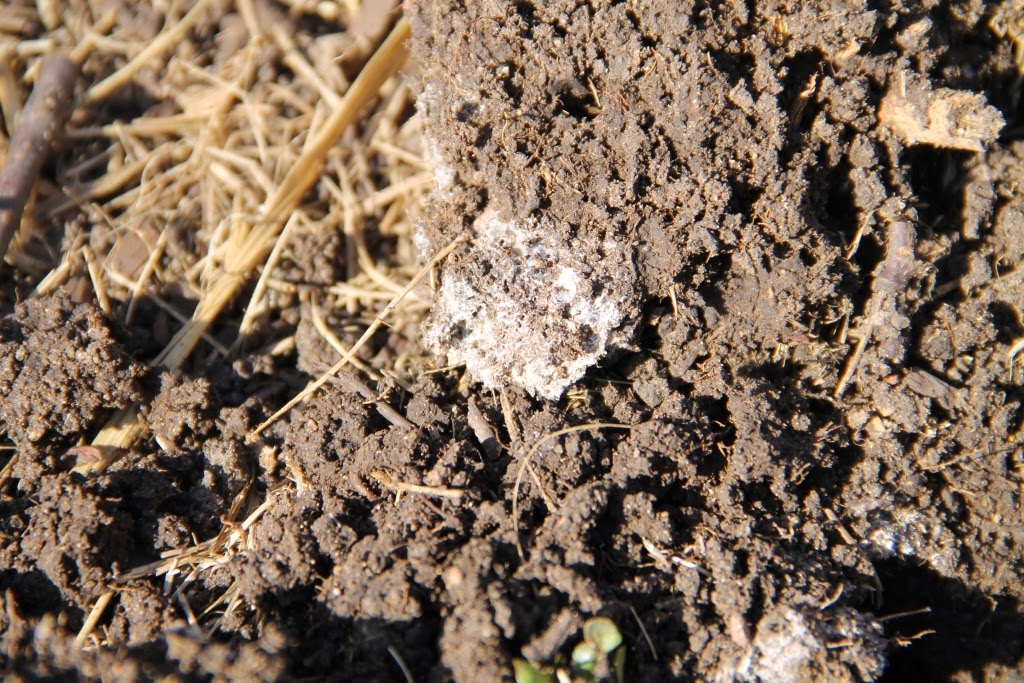
Weve also been finding pockets of dirt where the soil particles are held together by some sort of white material.  It looks slightly filamentous, but is very crumbly at the same time.  Some kind of good fungus, we hope?

We had a few inches of snow last Thursday, but the chickens could see green grass under the picnic table and freshly turned dirt out in the yard.  When we got home from work, we could tell they had a case of coop fever.  It makes us happy that the chickens arent content to just hang out in the coop all day.

What made you happy this week?

Read more

Saturday, May 14, 2016

Homestead Happiness February Week 3

0

Were still fine-tuning some of the experimental details on our eggshell leavening, but it was otherwise a productive week around the homestead (thanks to some unseasonably warm weather!).  Heres what made us happy this week.

Black raspberry wine, primary fermentation
We got another batch of wine started, this one from frozen black raspberries.  They had been in the freezer since July of 2004!  They say a fine wine improves with age, guess well find out if that applies to aging before fermentation, too.  At least, the berries still tasted good!  Also, starting the wine meant Jake could clean up the mess that the berries made in the fridge while they were thawing.  That made Katie extra happy.

Dormant raspberry bush with straw mulch
Outside, highs in the 50s and 60s (°F) made for happy playing in the dirt, including playing musical berries.  We transplanted dormant strawberries out to the garden where we can protect them with the motion detector sprinklers, and dormant raspberries to the place vacated by the strawberries since they werent thriving in their original location.  Also, Musical Berries is going to be the name of our new family band.

Blue spruce planted in hole from old stump
Also on the yard work list was chopping out the remaining stump from the tree of heaven, filling the hole with dirt, and planting another tree in its place.  Some of the old stump pieces had termites, which the chickens liked a lot.  In fact, they were willing to brave a battlefield of flying wood chips to get to them, and with 100% survival rate.  Weve got ninja chickens! (Never mind, were going to call our band Ninja Chickens.)

Wood ash in Dakota Rocket Silo
In the process of our eggshell leavening experiments, we also made a big pile of wood ashes, which well use in a future set of leavening experiments.  The connection between these two will become apparent in the near future.

Rhubarb waking up
The rhubarb is alive!

Chives waking up
The chives are also alive!  Its always nice to know the plants are starting to think springly thoughts, too.  The weather, on the other hand, is very ambivalent--after highs in the 60s on Saturday, we got a nice blanket of snow last night!

Egg tally chalkboard
The chickens are also revving up their egg production--four eggs in four of the last five days.  Keep up the good work, ladies!

What made your homestead happy this week?


Read more

Friday, April 22, 2016

Homestead Happiness May Week 3

0

We skipped a couple weeks of our HAP posts, in part because we were busy with non-homesteading-related stuff, and in part because weve been doing a bit of twiddling our thumbs waiting for the dirt to dry out enough to plant the garden.  But theres still plenty to be happy about!

First off, the wild greens in the yard are loving all the rain.  We havent planted any greens in the garden yet, but we sure havent had to leave the yard for our vegetables!  You may have guessed from the last couple posts that weve been eating a lot of dandelion greens and sorrel (and youd be correct), but the mallow (in the picture) has also been a valuable addition to our plates.

The hops plant came back!  And its already as big as it got last year!  Hopefully it will help the bees battle varroa, although we dont have too strong of hopes that the bees will self-treat.

One leaf on our rhubarb was almost completely eaten by slugs (we think), and the stalk had come partially disconnected.  So we picked it the rest of the way, making this little 4" morsel is the first rhubarb weve harvested from the plant.  It made one bowl of oatmeal very awesome.

Judging by the number of volunteer potatoes that came up this spring, we need to do a better job harvesting next year (although volunteer veggies that made it through the winter are always kind of fun) .  They got knocked back a bit by a Mothers Day snowstorm, but theyre pushing on now.  We pulled out a couple that were in this years garden beds, but the ones that came up in what are now aisles will get to do what they want for the summer.  For the ones we had to move, we dug the best specimens into the compost bin to see what theyd do, since last year we had a regular old russet potato from the store sprout in the compost and survive the summer to actually produce a pound or two of potatoes.  That was a nice surprise!

One nice thing about all this rain is that its made it really easy to pull weeds.  The strawberries needed it bad, and we happily removed all the quack grass in there.

We did take the risk of turning over a couple beds to get the onions and sweet potatoes planted since they really needed to get in the ground.  Hope they do ok!

Some of the first wildflowers (not including dandelions) are also starting to bloom.  These guys are in with some roses that are looking a little deficient in iron or nitrogen.  We havent seen any bees on these blooms yet...

...but they are working on the chives that got ahead of us!  This little gal was so into it, she started probing the next flower while she was still standing on the first one!  Good work, ladies.

What made you happy this week?

Read more

Tuesday, March 29, 2016

Homestead Happiness and Progress for February Week 3

0

Twas an eventful time this week on the homestead, bolstered by some nice weather and a couple snowy days. Check out what happened this week at THL!


A seven-egg day!  That means all of our hens are definitely laying.  (We were pretty sure thats been the case since mid-January, but this was the first time we got a horizontal bingo on our egg-tracking chalkboard table.  Vertical bingo has been achieved by our Red Star and New Hampshire Red, who have laid eggs on 21 and 15 consecutive days, respectively (also 25 out of 26 days for Red Star and 23 out of 26 days for New Hampshire).


Monday was a snow day, which we used to make a picnic table.  Happy belated valentines day Katie!


But by Friday, things had thawed out enough that we could see the feral poppies pushing through the leaves with new growth.  Everything is now covered in snow again, but thats ok!  We know whats underneath.


First try at isolating potato starch.  It works!  It turned out ok, but we want to tweak a few things before we turn it into a full blog post.


A liver-and-onion strata (with kale)!  Delicious, packed full of vitamins, and appearing in our upcoming strata cookbook.


Seed catalogs!  Wherefore lyeth such a slippery slope of inspiration upon our kitchen table?


What fun stuff happened on your homestead this week?


Read more

Monday, March 28, 2016

More Fun With Crab Apples 3 The Juice

0

We continue our crab apple-themed posts (the original, part 1, and part 2 here) with some ideas for what to do with the juice part--the water the crab apples were boiled in, after straining out the apple solids.  Lets get to it!

Idea #1: Liquid pectin.  Its just the aforementioned liquid fraction. Boiling solublizes the pectin, so its essentially a hot water extraction of the crab apples.  Pretty easy!  Check if its strong enough by adding one teaspoon liquid pectin to one tablespoon high-proof alcohol (91% rubbing alcohol (isopropanol) or 95% ethanol), and waiting a minute.  If the gelatinous mass can be picked up with a fork (example in fourth photo here), its strong enough.  If not, boil the liquid pectin down some more and try again.  To use in jam, take one cup liquid pectin per four cups fruit pulp and five cups sugar.  Mix pectin and fruit pulp, bring to a boil, mix in sugar, return to full rolling boil.  Boil one minute, pour into hot, clean jars, and process in a hot water bath or pressure canner, or by whatever method you prefer.


Idea #2: Crab apple-ade.  We take the liquid, dilute it by half with water, and add a teaspoon of sugar per cup to sweeten it.  Sweet-tart and refreshing!


Idea #3: Crab apple wine.  There are a few recipes here and here, but were usually a little more cavalier about the process.  Well post more details on our home wine-making adventures in the future, but our general process is this: Measure the specific gravity of the juice (left), add enough sugar so that the yeast will make enough ethanol to kill themselves...


...add the yeast to a half cup of the sweetened juice and let it sit for a few minutes to proof...


...then put everything in a stainless steel pot with a bungee cord-secured towel to keep out fruit flies. (Or primary fermentation vessel if you want to sound legit.)  It stays here for about a week, then gets transferred to a carboy (or jug) with an airlock and left for several months while the yeast finish their magic.  When fermentation stops and the specific gravity shows sufficient alcohol to kill the yeast, we check the flavor and bottle it up! (Again, more details in a future post.)


Idea #4: Powdered pectin.  Remember the test to see if the liquid pectin solution is strong enough? Commercial powdered pectin is made by a similar process.  We tried to recreate that process on a kitchen scale.  We took one cup of the liquid pectin plus a half cup of 190 proof ethanol.  That precipitates a lot of the pectin as a gel...


...that can be filtered out of the liquid.  Dont throw away that liquid!  That would make for some very expensive pectin!  Instead, mix it with some Celestial Seasonings tea, and youll have a Colorado Iced Tea.  Whats up now, Long Island? (Note: the liquid has a very high alcohol content, so you dont need much to make a very potent drink.)


The filtered pectin gel can be collected...


...dried like fruit leather...

...baked at 150 °F until crispy, frozen, and ground with a mortar and pestle into a powdered pectin product. (In retrospect, it might be possible to skip the food dehydrator and freezing steps.) Our pectin is darker than the store-bought powdered stuff probably because we didnt do any of the washing steps that the commercial producers do before they dry and grind. This was a lot of work for a little pile of powder, but we were able to make it using only things we already had on hand.  It would also store longer and in less space than the liquid stuff, if we didnt have to use this whole batch right away to answer the critical question: does it work for jam?

 
We took some raspberries out of the freezer and made a mini-batch. (The sure-jell recipe called for one packet of pectin powder (about 0.25 cup) for 5 cups fruit and 7 cups sugar.  We ended up with about two teaspoons of our powder, so we cut the recipe to 1/6 scale.)  We also ran a control (without pectin; jar and toast on left in photo) to see if the jam would set on its own just from the sugar.  While both batches set, the one containing pectin is noticeably firmer (but still spreads easily). So, our powdered pectin made a difference! Yay!


Idea #5 (bonus!): Crab apple molasses.  In our first attempt to make powdered pectin, we tried just drying down the liquid pectin to a solid.  But instead of a light-colored substance to grind, we ended up with this dark-colored, gummy stuff.  So we tasted it.  Its good!  A lot like molasses, but with an apple flavor.  Time to make some crab apple molasses cookies!

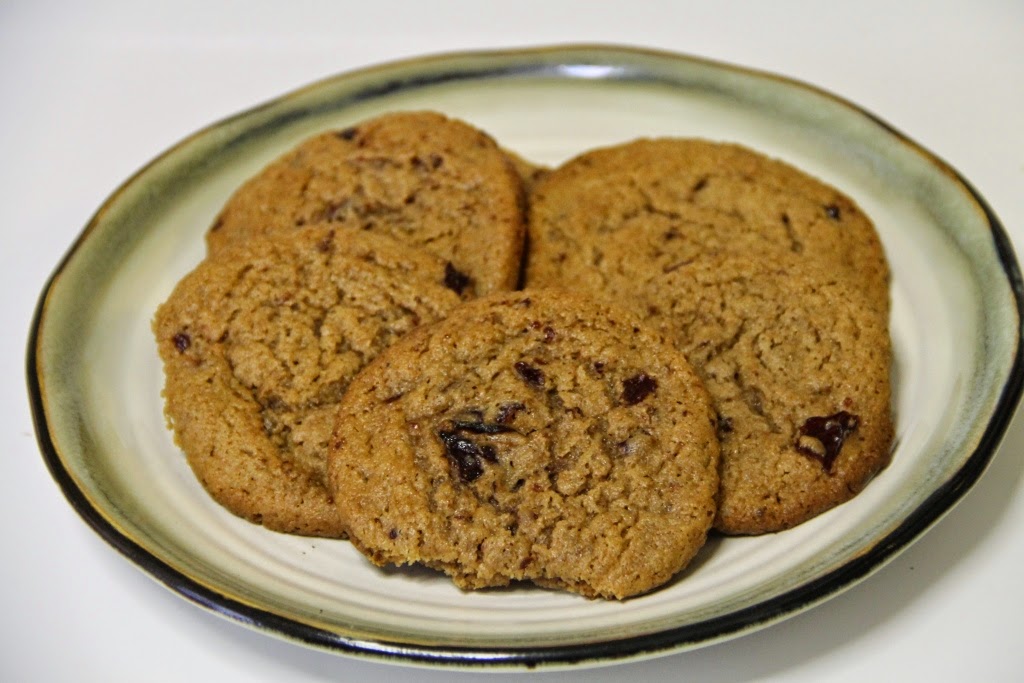
We took our favorite molasses cookie recipe (thanks, Grandma!) and swapped regular molasses for crab apple molasses straight up. A couple things we found out: our crab apple molasses is a lot harder than regular molasses, and doesnt mix with the cookie dough very well.  We heated it up, and that helped some, but there were still chunks.  Thats why it looks like we made craisin cookies in the photo.  In fact, Katie thought they were craisins at first! The chunks are chewy and sweet-tart, so it really is hard to tell a difference.  So far, 100% of household correspondents have concluded that the cookies are tasty.


What do you do with your crab apples?  Let us know in the comments section below!


Read more

Thursday, March 17, 2016

Fourth Annual New Mexico Food and Farms Day Scheduled for Wednesday February 3 in Santa Fe

0

The New Mexico Food and Agriculture Policy Council invites you to the Fourth Annual New Mexico Food and Farms Day at the State Capital.  The event is held in conjunction with  New Mexico School Nutrition Day, Cooking With Kids Day and the New Mexico Academy of Nutrition and Dietetics Day at the Legislature.

"New Mexico has a vibrant food and farming culture that is significant to our rural economy and provides employment opportunities on farm; in direct, wholesale, and retail opportunities; in food processing, distribution, value-added businesses," said Pam Roy, coordinator of the NMFAC and Farm to Table.

"As a broad based group of partners and participants, were highlighting the Farm to School movement in New Mexico and the many schools that buy fresh fruits and vegetables from local farmers, school food service who care about providing meals with New Mexico grown produce, and most important, students who learn to incorporate fresh produce in their diets and enjoy experiential learning through programs like Cooking with Kids, Kids Cook, school gardens and more," added Roy. "Our children have the opportunity to enjoy New Mexico grown fresh fruits and vegetables in school meals and snack programs."

The day will include:
8:00 - 9:00am
Education Through Advocacy, room 324 at the State Capital - Participants will get a brief overview of the New Mexico legislative process before launching into a morning of fast paced activities. By Invite Only

8:30 - 11:00am
In the East Wing of the Capital (next to the Rotunda), organizations and agencies will share information and educate the public about their programs and their relationship to each other and the goals and purpose of the Day and beyond.

9:00 - 9:45am
Celebrate the 1st Annual Farm to School Award Ceremony and Press Conference. At the Rotunda, this special awards ceremony will recognize key individuals and their organizations for their work in creating educational programs in schools for children to learn about the world of food and gardening; food service and food entrepreneurs who have, through innovation and policy, changed the rules to be able to partner with local farmers to buy the freshest local produce for school meals; and, farmers who have been on the front lines for change by building partnerships with schools to purchase locally grown produce and paving the path for others. This will be the first on many occasions to honor leaders, risk takers, innovators, and believers.

10:00 - 12 noon
The New Mexico Legislature will honor New Mexico Food ad Farms Day, New Mexico School Nutrition Day, and Cooking with Kids Day in both the House and Senate Chambers. Policymakers will highlight the importance of these events and most importantly will recognize individuals and organizations for their efforts in building an important aspect of food, farming, and health initiatives in New Mexico.

12:30 - 3:00pm
Round Table celebration, discussion, and next steps by all of the groups and individuals involved. We ask ourselves what we learned, how it builds relationships and coordination, and what we commit to doing moving forward. Our discussion includes providing lunch. Venue TBD (more information forthcoming)

The organizations joining in the celebration include: New Mexico Food and Agriculture Policy Council, Farm to Table, New Mexico School Nutrition Association, Siete Del Norte, Cooking with Kids, Mid Rio Grande Council of Governments, New Mexico Cooperative Extension Service, New Mexico Dietetics Association, New Mexico Farmers Marketing Association, Santa Fe Food Policy Council, FoodCorps, Community Outreach Patient Empowerment (COPE - a Navajo Nation Coalition and youth group NCHO), Dine Food Sovereignty Alliance, and more.

Read more

Wednesday, March 16, 2016

Homestead Happiness March Week 3

0

The weather was pretty nice this week--lots more signs of spring (including the calendar), and some progress on our goals for the year.  Yay!

The first spring flowers in the yard!  We saw some crocuses at the neighbors last weekend, but these dandies are the first ones in our yard.  Cant wait for pancakes and steamed greens!

Last week we mentioned that we found a source of free straw to use for composting, mulching, chicken bedding, etc.  This week we also found a source of free horse manure (hidden under the straw in this picture), as much as we could ever want.  Its organic, mixed with shavings and hay, and comes (accidentally) pre-inoculated with fungal mycelium. Gorgeous!  And theyre just giving it away!  Can you believe it?

When the chickens saw the pile, they were possessed by the spirits of entropy and turned it into this within a couple hours.  Theyre not too interested in the manure part yet, but they really like scratching through the straw.  Since one of our goals for the year is to cut down on chicken feed costs, were trying to get a miniature version of this going, and it looks like the chooks will be amenable.  (The full version of the video linked above--at Geoff Lawtons website, e-mail subscription required for full access--explains more about the operation, including predator control.  Harvey Ussery also wrote about the concept here and here.)

We also finally got our garden plans in order--layout in the yard and most of the seeds bought.  (Kudos to Territorial Seed for beating the pants off all the other seed catalogs in terms of variety and information about the plants.)  Now we just need to find time to dig up the middle half! (Or not dig part of it, since we want to try the no-till method Anna described in The Weekend Homesteader with some of the beds.)

And last, but not least, the rhubarb is alive!


What made you happy on your homestead this week?


Read more

Thursday, March 10, 2016

Bee Reset Wax Rendering v2 0 and 3 0

0

We wrote a couple weeks ago that we used the shook swarm method to put our bees on fresh comb and hopefully help them shake their case of EFB.  So the bees got some new digs, but what happened to the rest of the hive--the honey, combs, frames, and hive bodies that were contaminated? The whole process would make for a very long blog post, so well break it up into a couple posts.  But to whet your appetite, heres the overall schematic:

This whole ordeal is a zero-waste process, which is nice.  On tap for today: frames and comb, in particular, wax rendering.

Were continually adapting our wax rendering process.  Version 1.0 we wrote about before, and was more of a treatise on how not to render wax.  Version 2.0 is a solar melter frankensteined together from parts of our cold frame.  The back is a piece from the brooder box, and the places they dont fit perfectly together are plugged with fence panels.

Inside is a regular Langstroth box with a couple 9" x 13"-ish aluminum pans, each with about an inch of water in the bottom (to keep the wax from sticking to the pans).  On top is our winter-time bee feeder...

...which is lined with an old t-shirt and has another Langstroth box stacked on top.

The combs to be melted get piled on the t-shirt, and the melter is covered by the windows from the cold frame, which are stacked to make a double-glazed top.  The windows should be washed to maximize the amount of sunlight that gets through (ours werent), and every crack and crevice should be sealed tight because when it starts to heat up, every honeybee within smelling distance will be drawn like a magnet. 

We set the whole thing up on the garage roof since it gets intense sun for most of the day.

A few days later, the combs are mostly melted down...

...but the yield of wax is a little disappointing.  A couple things probably decreased our yield.  First, the t-shirt filter held up a lot of the wax itself.  Other folks have had better luck with a paper towel.  Second, the temperature should have been higher.  We added some reflective insulation around the walls, which helped, but not enough.  More insulation and a more airtight construction would have been better.  We could have washed the windows, which would have helped even more.  As it was, we got readings up to ~155 °F inside the box when the glass was on.  Good enough to melt the wax, which happens at ~145 °, but hotter would be better.

Also, when we tried a deep Langstroth box full of frames, we only got minimal melting

Plus, during the time spent with all our rejiggering, we found out that bees arent the only bugs interested in the wax.  Ants and earwigs love it, too.  But at least theres a silver lining: if you want bespeckled wax, the sprinkles are free!  The final takeaways from version 2.0?  There are some kinks to work out, but theres good potential.  Significant improvements wouldnt be too difficult if we could find the time to properly build a solar oven (which is on the to-do list anyway), but that will have to wait until a future date.  Also, some folks have noted that from some old combs, solar melting, even in a well-designed system, doesnt cut it.  Those combs need steam to release the wax.

Enter version 3.0.  Its inspired by a few other designs weve seen and Keiths comment on our original wax melting post.  The core is a big pot with some water in the bottom, and an aluminum pie pan boat.

That goes on top of the rebuilt Dakota Rocket Silo, which is burning the contaminated frames (and other wood).

A t-shirt filter is secured to the top of the pot.  The combs go in the filter.  The idea is that the steam rises up and condenses on the combs to melt the wax.  The wax is supposed to drip off the lowest point on the t-shirt into the pan below.

The first part of that works well.  The wax melts in half an hour to an hour if the fire is really roaring.

Unfortunately, it also runs down the side of the pot, so in addition to the nice wax cake we get in the pie pan, theres also a layer in the outer pot.  (This picture is from the following morning, after everything had cooled down.)  What we really need is some kind of impermeable insert in the top of the pot that prevents the t-shirt from contacting the pot directly, but that has a hole in the middle to direct the wax to the pie pan.  Probably could be done with aluminum foil. 

Also, we should point out that the wax accumulating on the water in the big pot can be a little dangerous because when a full layer of wax forms, it prevents the water from evaporating normally.  The result is that the water gets super-heated and instead of boiling steadily, it bumps violently, and then does nothing for a few minutes, before bumping violently again.  (The same thing can happen in your microwave if the water is very still while heating.)  When the bumping was happening in our setup, it was actually able to move the pot around, and if we hadnt been watching, it could have tipped over into the fire.  Since the wax is flammable, that would have gotten exciting quickly!

In any case, the melted wax and water can be poured into a pan to cool down.

The wax will form a cake on top, which can be easily removed.  We had a lot of comb to melt, so we ended up with several of these cakes.

To make them more compact, we built a makeshift mold, lined it with aluminum foil, and stacked pieces of the cakes inside.

When the summer heat had broken, we melted it in the oven at ~150 °F.

On cooling down, it solidified, at which point the foil and wax can be removed from the box.  The foil should readily peel away from the resulting block, leaving a nice chunk of purified beeswax to play with.

The stuff that got filtered out (slumgum) can be composted, used to start fires, or used to make swarm traps more attractive.  Since we started this whole ordeal to get rid of EFB, we wont be using it in our swarm traps.  We tried a few different ways of making slumgum fire starters, including packing it into paper egg cartons, wrapping golf ball-sized portions of it in old phone book pages, and packing a thin layer of it between layers of paper grocery bags.  In our experience, its the residual wax that actually starts burning, and the rest of the slumgum burns, but does more to inhibit the wax burning than to really support combustion.  So, adding additional dry, combustible material like paper, sawdust, or wood chips helps a lot.  Also, getting that extra combustible material to wick up and/or be coated in the wax helps it work under wet conditions.  Once we had everything packed in like we wanted it, we put it in a 200 °F oven for an hour or two to melt the residual wax and get it to soak into the paper. The egg cartons are easily divided, but the slabs with the grocery bags we cut into 1"-2" squares.

The t-shirts themselves can also be cut up to be fire starters, or saved for future use.  Since we dont want to transfer EFB to any future batches of wax, were going with option #1 for the t-shirts this time.

We did a quick trial run of all four of our different kinds of fire starters (clockwise from top: t-shirt, egg carton, phone book, and grocery bag), and we noticed that the phone book page-wrapped slumgum balls were hard to light and keep lit, the wax-soaked t-shirt lit the fastest and burned up the fastest, and the egg carton-slumgum and paper grocery bag-slumgum fire starters had good longevity but could still be easily lit by a match.

Finally, a quick note on cleaning up the wax.  Many folks caution that its nigh-on-impossible to clean up cookware items that have been contacted by the beeswax, but weve not found that to be entirely true.  First, the thin coating that forms on pots and pans will eventually wear off in continued use, and beeswax is inert in the human digestive tract, so one approach is to ignore it; no harm, no foul.  Second, weve found that mixing beeswax with some kind of vegetable oil (olive oil, canola oil, soybean oil, etc.) when both are above the beeswax melting temperature (~145 °F), makes a blend that can be cleaned up with soap and water, even when cooled back down to a touch-safe temperature.  And third, a scouring powder, in particular Bon Ami, which doesnt have anything in it that we would be worried about contacting food, cleans things up pretty well.

There you have it!  Our current procedure for processing contaminated wax and frames, waste free.  How to you render and clean up wax?


Read more

 
Powered by Blogger